


Welcome to the Enjuvie Lashes Tutorial.
You can find our Video tutorials below followed by our FAQs. If you still need help feel free to reach out at support@enjuvie.com
Additionally, if you prefer to follow a written tutorial you can find it here.
Tutorial 1 of 2 | Application Guide

We highly recommend watching both videos & reading the written tutorial.
Optimal Lash Placement Point: Approximately 3-5mm (0.3cm to 0.5cm) away from the inner corner of your eye.
Video 2 of 2 | Close To Lash Line Tutorial

Frequently Asked Questions 👀
Do you have a written tutorial?
Do you have a written tutorial?
Yes we do! We highly recommend reading the written tutorial prior to watching the video as it goes over the tutorial more in-depth!
You can find the tutorial by clicking here

Why did I only receive 1 pair?
Why did I only receive 1 pair?
All orders are shipped with 2 pairs.
The 2 pairs of lashes you see in your Mirror Case are for your left & right eye.
They are magnetized together - you may separate them by peeling them off each other gently from the edges of each/any end.
Why are the lashes not coming off the applicator?
Why are the lashes not coming off the applicator?
This is a common mistake during application which is easily resolved by fixing the following:
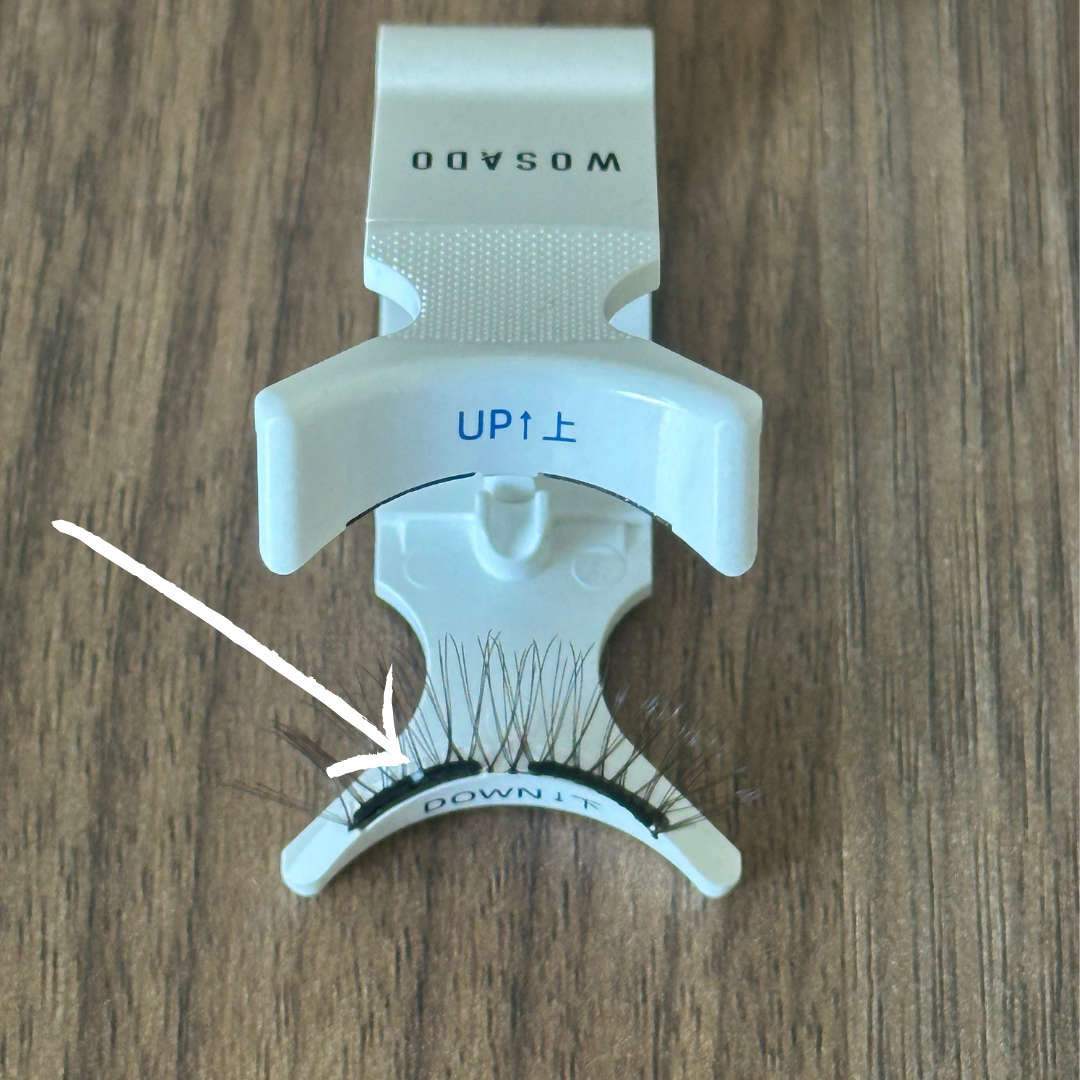
✅ Ensure the top and bottom lashes are placed on the applicator accordingly on the areas marked UP & DOWN.
✅The lash with the BLUE dots, will go on the applicator label marked UP.
✅The lash with the WHITE dots will go on the applicator label marked DOWN.
Once this is complete, you can do a test and snap the applicator together and you will see the magnets are working!
YOU MUST: Ensure the BLUE & WHITE DOTS are VISIBLE after the lashes are applied on the Applicator. Picture is attached below for reference:
Why are the magnets are not working?
Why are the magnets are not working?
If the lashes were magnetized together on arrival, it is evident the magnets are functional. If you're not able to magnetize them onto your lashes, it means they were placed on the applicator incorrectly. Please ensure the lash with the Blue magnet is on the Applicator label marked UP and the lash with the White magnet is on the Applicator label marked DOWN.
YOU MUST: Ensure the BLUE & WHITE DOTS are VISIBLE after the lashes are applied on the Applicator. (Image attached)
Why is the lash band visible from the outer edges?
Why is the lash band visible from the outer edges?
The best tip for this part is applying the lashes closer to the inner corner as mentioned in the tutorial.
To reduce visibility of the lash band: Ensure the band is close as possible your lash line.
Tightline: Apply black eyeliner to your upper waterline to hide gaps and blend the lash band.
Apply the lashes closer to the inner corner (some users note that the further from the outer corner it is the better). As you can typically angle the lash band better when they are close to the inner corner.
Apply a light coat of mascara to your natural lashes before wearing—this helps reduce the contrast under the band.
If needed, apply eyeliner to mask the gap.
Note: This band visibility is usually only visible to you during a close up video/mirror check when it’s applied further from the lash line. Others are typically not able to see this in a normal setting. You can ask around to confirm! If you still have trouble, feel free to contact us and we’ll make it right!
Why are the lashes sliding off?
Why are the lashes sliding off?
If you feel the lashes are sliding off, please try to apply them after using the Lash Fixer Gel. That should fix it!
Pro Tip: Curl your lashes before applying them to prevent them from sliding off, mascara can also help in some cases!
Why can't I get them close to my lash line/eyelids?
Why can't I get them close to my lash line/eyelids?
This will take some practice to perfect, we recommend you keep the curve of the applicator aligned with the curve of your natural eye shape and lift your eyelid upwards using the applicator so your inner lash line is visible. (this is the trickiest part and will take practice to perfect)! 😁
Watch the tutorial linked below to perfectly place your lashes close to your lash line: 👉 Lash Line Placement Tutorial
Note: Slight deviation from the Lash Line is totally normal while you perfect your application and is not typically visible to others - looking in a camera or mirror may magnify the effect. Request a family member or friend to take a look for confirmation and tips on where to adjust!
The pro tip below is very helpful in fixing this - and remember, practice makes perfect 😊
PRO TIP: When sandwiching the lashes into place, clamp down multiple times, moving closer to the lash line with each press to achieve a snug and seamless fit for the most natural look.
Additionally, if just the edges of the lashes are far from the lash line you can gently push them in with your fingers as well. Please note this may not work for everyone.
Why is the outer/inner corner hanging off the edge?
Why is the outer/inner corner hanging off the edge?
This usually happens when the lashes aren’t placed close enough to your natural lash line or if the positioning is slightly off. Here’s how to fix it:
- Follow this quick video tutorial to ensure you're applying the lashes correctly and as close to the lash line as possible:
👉 Lash Line Placement Tutorial - Once they’re applied as close to the lash line as you can get them, apply a coat of mascara (if possible) to help blend your natural lashes with the magnetic lashes.
- You can also apply a thin line of eyeliner to fill in any gaps and create a seamless look.
- If the corners are still lifting, try adjusting the placement slightly closer to the inner corner for a more secure fit.
- You can also gently adjust the edge of lashes with your fingers and push them closer to the lash line
With a bit of practice, you’ll find the sweet spot that keeps both corners firmly in place! Slight deviations are possible and can be blended with mascara/eyeliner.
Why are they not fitting my entire lash width?
Why are they not fitting my entire lash width?
If the lashes seem too short for your lash line, we recommend positioning them closer to the outer corner of your eye. This approach provides a more natural appearance by enhancing the area that typically has the densest lashes.
Please remember that all eye shapes are unique, and Enjuvie is appreciated by customers with a variety of eye shapes, from narrow to wide. Lashes that appear slightly short to you often look perfectly natural to others. Using a mirror can sometimes exaggerate minor issues that aren't noticeable in regular view.
Why is the lash band visible after they’re lashes are applied on my eyes?
Why is the lash band visible after they’re lashes are applied on my eyes?
This can happen if the lash band isn’t sitting close enough to your natural lash line, especially at the outer edge where most eye shapes curve down slightly. It’s not a defect—it’s just part of how liner-free magnetic lashes work. Even though this downside exists, we can do our best to make it look as natural as possible. To reduce visibility of the lash band:
Ensure the band is close as possible your lash line.
Tightline: Apply black eyeliner to your upper waterline to hide gaps and blend the lash band.
Apply the lashes closer to the inner corner (some users note that the further from the outer corner it is the better).
Apply a light coat of mascara to your natural lashes before wearing—this helps reduce the contrast under the band.
If needed, apply eyeliner to mask the gap.
Note: This band visibility is usually only visible to you during a close up video/mirror check when it’s applied further from the lash line. Others are typically not able to see this in a normal setting. You can ask around to confirm! If you still have trouble, feel free to contact us and we’ll make it right!
How do you clean the lashes?
How do you clean the lashes?
Cleaning your lashes is simple — just use a slightly damp cotton swab (Q-tip) to gently wipe away any debris from the magnets and lash hairs.
You may also use our Lash Cleanser
Pro Tips (MUST READ FOR MASTERING APPLICATION)
Pro Tips (MUST READ FOR MASTERING APPLICATION)
When sandwiching the lashes into place, clamp down multiple times, moving closer to the lash line with each press to achieve a snug and seamless fit for the most natural look. Example of this is shown in the video tutorial.
- Curl your lashes before application for a more accurate and longer hold + easier application.
- Ensure you are placing the Applicator gently against your eyelid for more control
- Push your eyelids up a little with the Applicator so the inner area of your lash line is more exposed to get them close to your lash line (video guide below): instagram.com/reel/C8yRMaBt-5e/?igsh=MTNwMmFqYXlrdDc2Nw==
- When using the mirror case, ensure it is placed at your chin-level as this will allow you to see your inner lash line
- If this is your first time applying the lashes, use a big mirror and move on to the mirror case after you've mastered application
- When snapping the Applicator together, ensure you sandwich each side evenly to ensure no lash/magnets are loose or hanging off your lashes
- Use the Lash Fixer provided in your order for stronger hold and prevent lashes from sliding if necessary
- Confirm whether the magnets are aligned as mentioned in Step 2.
- Optimal placement point is typically 3-5mm (0.3-0.5cm) away from the inner corner of your eye. If the lashes are not as wide as your eyes, you can place it more towards the outer corner for a more natural look
- Ensure the blue & white dots are visible to you after the lashes are placed on the applicator.
- If the lashes slide during your day to day movements, keep the mirror case, fixer gel & applicator handy in your bag and adjust them on the go in seconds!
- If this is your first time using falsies, allow 3 - 5 minutes of wearing to allow your eyes to adjust to the additional lash length for optimal comfort .
Many customers feel the learning curve, but once they get the hang of it - they love it and rate us 5 stars! We hope you will too.
Still Need Help?
Remember, the learning curve is totally normal and practice makes perfect. Give it a few tries, and soon you'll be applying your magnetic lashes like a pro, ready to slay your day in no time!
If you have any more questions, don't hesitate to contact us at support@enjuvie.com we want you to be satisfied with your order and provide the best review - to ensure there are no misunderstandings do not hesitate to reach out to us and we will fix any issues.